Technical terms of quality management: M
M7
Machine capability
Suitability of the machine. Machine capability indices that are determined by the machine capability analysis are the CM and CMK value. They represent an estimate of the dispersion of the interesting, quantitative characteristics. When calculating these indices, only the machine‘s own influences are taken into consideration.
Machine capability analysis
Magic triangle
Relationship between quality, costs and time. The objective must be to balance all three competing parameters.
Main effect plot
Graphics tool to indentify a variable‘s influence on the output variable. Main effect plots are primarily used in the DoE (Design of Experiments) in order to examine how significant a variable‘s influence is on the output quantity being examined.
Main process
Higher level process in a process hierarchy. Each main process constitutes an organizational unit and in turn is divided into various sub-processes.
Maintenance
- Servicing, care, inspection and repair of technical instruments in a system in order to preserve the functional capability.
- Maintenance means the actions taken to preserve the desired state, inspection means actions to evaluate the actual state and repair means actions to restore the desired state. All actions arecombined under the generic term maintenance.
Malcolm Baldridge National Quality Award
Quality award in the USA. This award is based on a TQM model: A maximum of 1000 points can be earned in each of seven categories. The prize has been annually awarded to a company from production, one from the service sector and to an SME since 1988.
Malfunction
Termination of a unit‘s capability to fulfill the required function. (IEC 60050)
Management
Coordinated activities to direct and control an organization. ISO 9000:2015 recommends using the term management only for one person or one group of people if the further context an additional conceptual definition makes it possible to avoid confusion with the term management as defined above. (On the basis of ISO 9000:2015)
Management by objectives
Also called management by results.
Management by Policy
Management of the objectives and the means. This procedure is based on the Japanese principle of Hoshin Kanri. Hoshin means objective or direction and Kanri stands for management or controlling.
Management liability
The responsibility of an entrepreneur or planner for deficient organization of its internal procedures. ISO 9001 certification makes it easier to be released from claims based on management liability.
Management manual
Management process
Process that has the character of giving instructions and making decisions. Management processes are also called control processes. In particular, these include human resources planning, corporate planning and target agreement processes, as well as the performance of statutory entrepreneurial duties.
Management representative
See Quality management representative.
Management review
Systematic review of the management system performed on a regular basis by the top level corporate management. It aims at ensuring and improving a management system‘s functionality, effectiveness and efficiency. In the framework of certification, the performance of one review a year is sufficient. If reviews are to be used as a tool for continual improvement, they should be conducted several times a year. In the case of a quality management review, the following aspects must always be considered: results of audits; customer feedback; process performance and product conformity; status of corrective and preventive actions; actions from previous reviews; changes with impact on the quality management system; and recommendations for improvement.
Management system
System to define policy and objectives and to achieve these objectives An organization‘s management system can include different systems, such as a quality management system, a financial management system and an environmental management system. (On the basis of ISO 9000:2015)
Management tools
The (seven) management tools are problem-solving techniques that are used to analyze verbal information on the basis of visual methods. These tools are preferably used to process complex problems or when there is little or no numerical data available. In particular, these are: affinity diagram, interrelationship digraph, tree diagram, matrix diagram, matrix data analysis (portfolio analysis), problem decision program chart, and activity network diagram.
Marginal costs
Costs caused by the production of an additional unit.
See also Variable costs.
Masing
Walter Masing (1915 – 2004), Ph.D. in physics, is a pioneer and important figure in quality science. Particularly in Germany he made a name for himself as a pioneer of modern, industrial quality science.
Master Black Belt
Coach and expert in the Six Sigma organization: The Master Black Belt is responsible for setting up the Six Sigma organization and for advising the Champions on how Six Sigma can optimally be employed and used to implement the firm‘s objectives. The Master Black Belt is the most important expert for all methods and tools, and conveys this information across all of a company‘s levels.
Matrix data analysis
Matrix diagram
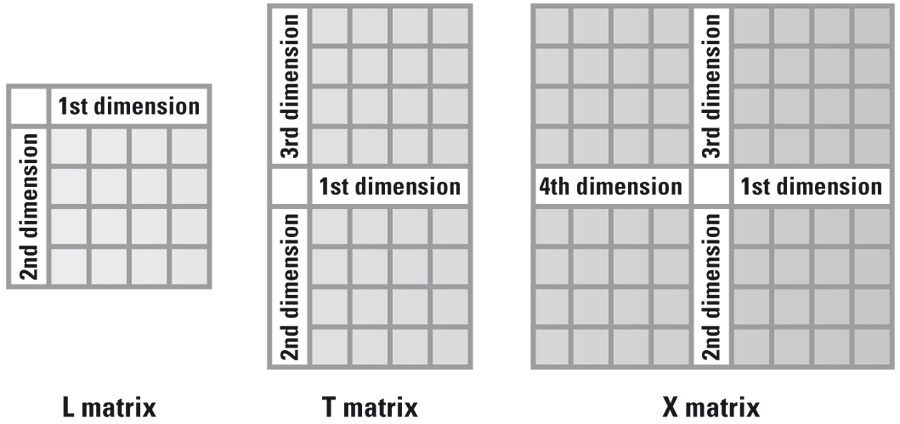
The matrix diagram is a management tool (M7) for representing complex interrelationships. With the help of a matrix, the relationships and interactions of a problem or question are revealed step by step and shown in a clear manner. Up to four dimensions can be linked to one another (L, T and X matrix).

Maturity level
Certain stage of maturity or organizational maturity of a company in the implementation of a management system or of a continual improvement process.
Maximum average outgoing quality
Maximum average outgoing quality in a single sampling instruction.
(DGQ Volume 11-04:2009)
MBNQA
See Malcolm Baldrige National Quality Award.
MbO
Management by Objectives.
MbP
Management by Policy.
MCA
See Machine Capability Analysis.
MCC
Machine Capability Control. See Machine capability.
MDT
Mean Down Time.
Mean value
Measurand
Physical quantity that is measured. (On the basis of DIN 1319-1)
Measure of dispersion
Index that registers deviations.
Measurement
- Process for determining a value. (On the basis of ISO 9000:2015)
- Determination of the value of a measurand for its quantitative comparison to a unit of measure, e.g., meter, liter, volt. (On the basis of DIN 1319-1:1995)
Measurement management system
Necessary system for attaining metrological confirmation (e.g., calibration) and for permanent monitoring of measurement processes. (On the basis of ISO 9000:2015)
Measurement process
Activities for determining a measured quantity. (On the basis of ISO 9000:2015)
Measurement result
Estimated value of a measured quantity that is acquired from measurements as an approximation of the true value of the measured quantity. (On the basis of DIN 1319-1)
Measurement standard
Material measure, reference material, measuring instrument or measuring system. It is used to reproduce, keep unchanged or represent a unit of measurement in order that it can be passed on to other measuring instruments by means of comparison. (On the basis of DIN 1319-1)
Measurement System Analysis (MSA)
Analysis of the behavior of a measuring system under real usage conditions (various operation sites, different inspectors, real workpieces, and installation into different measuring devices). The results make it possible to state whether or not this inspection, measuring and test equipment and measurement systems are suitable for use in measurements with certain stipulated tolerances or process dispersion.
Measurement uncertainty
Estimated amount acquired from measurements to identify a range of values within which the reference value of the measured quantity lies with a specified probability, whereby the reference value can be the true value, the correct value or the expected value, depending on the definition or agreement.
(DGQ Volume 11-04:2009)
Measuring accuracy
Range in which an experimentally determined quantity can deviate from the actual value. It is a measure of the value‘s accuracy (also measurement uncertainty or error).
Measuring equipment
Measuring instrument, software, measurement standard, reference material, auxiliary apparatus or a combination of these required to carry out a measurement process. (On the basis of ISO 9000:2015)
Measuring instrument
Instrument for measuring a measured quantity. It can be used either alone or in combination with other equipment. (On the basis of DIN 1319-1)
Measuring object
Bearer of a measured quantity. These can be bodies, processes or states. (On the basis of DIN 1319-1)
Measuring system
All measuring instruments and associated additional equipment (e.g., thermostat) in order to achieve a measurement result. (On the basis of DIN 1319-1)
Median
Characteristic value of the individual element of the sample that is in the center position of the observation series when put into ascending order. 50% of all values lie above the median and 50% of all observed values lie below the median. It divides the measured values into two halves.
Method 635
Creativity technique and problem-solving method for generating new and unusual ideas. Prof. Bernd Rohrbach developed it in 1968. Procedure: Each participant is given a piece of paper that is the same size. This is divided into 18 boxes with 3 columns and 6 rows. In the next step, each of the 6 participants is requested to write an idea in the first box of each column. Each participant passes his/her piece of paper on to the next person in the clockwise direction after around 3 to 5 minutes (depending of the level of difficulty). Now the next person in line must take the ideas that were already generated and supplement and further develop them. 635 stands for 6 participants, each of whom develops 3 ideas and passes them on 5 times. The advantage of this method is that many ideas are generated in a short time (max. 108 ideas in 30 minutes).
Metrological characteristic
Distinguishing feature of measuring equipment, such as the measurement range or stability or the discrimination threshold. The metrological characteristic can influence the measurement results. Measuring equipment usually has several metrological characteristics. These can also be subject to calibration. (On the basis of DIN 9000:2015)
Metrological confirmation
Activities required to ensure that measuring equipment fulfills the requirements for the intended use. Generally, metrological confirmation, calibration or verification includes every necessary adjustment or repair with subsequent recalibration, comparison with the metrological requirements for the intended use of the measuring equipment and all necessary sealing and labeling. Metrological confirmation is not achieved until the suitability of the measuring equipment for the intended use has been verified and documented. The requirements for the intended use include such criteria as measurement range, resolution and limiting values. Requirements for metrological confirmation are usually not identical to the product requirements and are also not specified there. (On the basis of ISO 9000:2015)
Metrology
Science of measuring.
Metrology functional area
Functional area that is organizationally and technically responsible for specifying and implementing the measurement management system. (On the basis of ISO 9000:2015)
MIL-Q 9858
USA quality requirements in the military sector. The program was developed in 1963.
Mind mapping
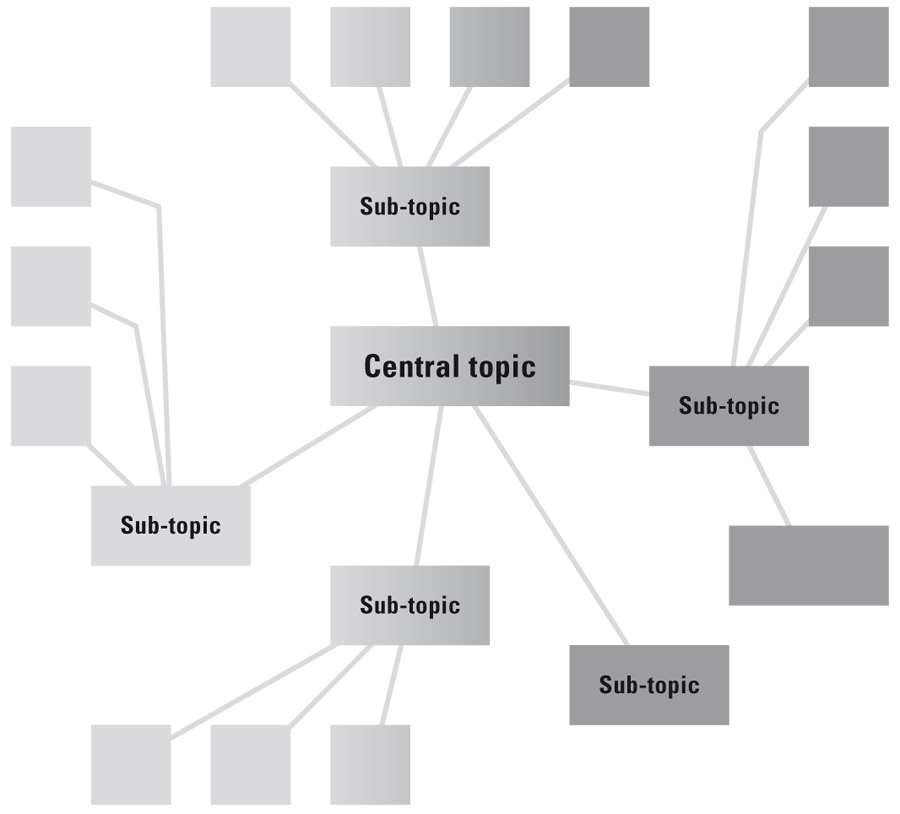
Technique for creating and working. A mind map shows the relationships between various concepts in the form of a graphical representation. British learning specialist Tony Buzan developed it in the early 1970s. Adressing both sides of the brain, contents are consequently easier to learn and store. Procedure: The central word (symbol or working title) is in the middle of the paper, which is always used in a horizontal format. Now main branches (lines) to sub-topics are developed, with the associated thoughts written on the branches as key words. The formation of sub-branches can be continued as required and the various “branches“ can be connected to one another. The result is a hierarchical arrangement of the thinking, which becomes more and more specific as one works outwards. The use of colors or images supports the “brain-friendly“ work.

Minor nonconformity
Nonconformity that presumably only negligibly reduces the usability for the intended use. Or a deviation from the applicable stipulations that has only a negligible effect on the use or operation of a unit. (On the basis of DGQ Volume 11-04:2012)
Mission
An organization‘s purpose (reason for being). A clear mission allows focused action in the company and forms the basis for formulating individual (quality) objectives.
MIT
Massachusetts Institute of Technology, Cambridge, U.S.A. www.mit.edu
Mode
The number that appears most frequently in a set of numbers.
Model test
Suitability test of a material final product. It comprises a design review and a type test. (On the basis of DIN 55350-17)
Monitoring
Determination of the status of either a system, a process, a product, a service or an activity. (On the basis of ISO 9000:2015)
Morphological box
Creativity and work technique developed by the Swiss astrophysicist Fritz Zwicky (1898 – 1974). The morphological box can help provide a transparent display of a problem‘s solution field and make it easy to work out alternatives. Procedure: The first step is to describe the problem. Then parameters or criteria that give a general description of the problem are defined. In the third step, solutions are sought for each individual criterion. Subsequently, a table is created that has the criteria in the first column and the possible solutions in the other columns. The fifth step involves the evaluation of the solutions on the basis of selected characteristics. The resulting matrix (or box) makes it possible to combine the potential solutions into alternative concepts. The last step is the selection of the optimal solution.
MSA
See Measurement System Analysis.
MSR
Measuring and control technology, also called instrumentation and control engineering.
MSTQ
Metrology, standards, testing, quality.
MTBF
Mean time between failures. Average operating time between malfunctions for units that are maintained.
MTBM
Meantime between maintenance. Average service life between maintenance activities.
MTTF
Mean time to failure. Also called average service life.
MTTFF
Mean time to first failure. Average time until first malfunction.
MTTM
Mean time to maintenance. Average time between two maintenance actions.
MTTR
Mean time to repair. Maintenance time or average repair time.
Muda
Muda refers to the following eight types of waste: overproduction, waiting time, unnecessary transport, over-processing, excess inventory, motion, defects, unused employee potential.
Multi-variate analysis
= Multi-vari analysis or multi-vari method
Graphics tool to check the influence that the input variables that are to be examined have on the output variables. In the traditional approach, a distinction is made between positional variation, short-term variation and long-term variation. In the Six Sigma methodology, this tool is used in the Analyze phase.
Multiple sourcing
Distribution of the same product that is to be procured or the same service to more than one supplier. This procurement principle is useful when it is necessary to guarantee a highly secure supply.
Mura
Variation (imbalance). Japanese term that is a basis of the lean philosophy. Mura identifies losses that result from the incomplete harmonization of capacities in the framework of the production process. Typical signs of Mura are queues at the machine or idle times.
Muri
Overload. Japanese term that is a basis of the lean philosophy. This refers to losses that emerge due to overload or overexertion in the framework of the working process.
MUT
Mean uptime.
